The configuration that will be used for Oracle Enterprise Manger is a modified level 3 Architecture. This approach will place one Oracle Management Server (OMS) and one Oracle Management Repository (OMR) on VMWare Virtual Machineswithin the VMWare ESXi framework. Then a second active OMS and a OMR physical standby database (data guard) will be built in a redundant VMWare ESXi cluster to provide high-availability for the OEM framework. Image 1 shows how the architecture will be laid out.
A disaster recovery site, with a smaller footprint, will be built at a later date. Once the disaster recovery site has been identified, then replication to the DR sight will be done using Sunguard storage replication. This will allow for the OMS and OMR to be restored using recovery techniques already in place for DBADEEDS.

OMS and OMR Servers
| VM Name | Purpose | Operating System | Memory (Gb) | CPU cores | Storage (Gb) |
| oemsapdev01.co.dbadeedssystems.com | OEM 13c OMS | RH 7.2 | 8 | 4 | 500 |
| oemrdbdev01.co.dbadeedssystems.com | OEM 13c Repository | RH 7.2 | 16 | 4 | 1024 |
Standby OMS and OMR Servers
| VM Name | Purpose | Operating System | Memory (Gb) | CPU cores | Storage (Gb) |
| oemsapdev02.co.dbadeedssystems.com | OEM 13c OMS | RH 7.2 | 8 | 4 | 500 |
| oemrdbdev02.co.dbadeedssystems.com | OEM 13c Repository | RH 7.2 | 16 | 4 | 1024 |
The Oracle Management Servers (OMS) will be configure in a two-node configuration for active/active functionality. This ensures that there is always an OMS available to end-users and for monitoring. Access to these OMS resources will be handled by a DBADEEDS provided Service Load Balancer (SLB). The SLB will be the address that agents point to for uploading status of monitored targets. The Software Library (SWLIB) will be located on a Network File System (NFS) that is mounted and shared on both OMS machines. This allows either OMS system to have access to resources stored in the SWLIB.
The Oracle Management Repository (OMR) will be place in one VMWare Cluster with an Oracle Data Guard Physical Stand-by configured over tothe other VMWare Cluster.
1.1 Physical Architecture
Targets:
The Oracle Enterprise Manager 12c environment will be configure to support a medium sized environment. This configuration will support up-to and not greater than 10,000 targets. This should provide some flexibility for growth over time. This size environment also supports concurrent users less than 10 to not exceed25.
| Environment Size | Agent Count | Target Count | Concurrent User Sessions |
| Medium | >=100, < 1000 | >=1000, < 10,000 | >=10, < 25 |
To calculate the number of targets that will be supports is not an exact science. Oracle considers everything a target. Using the following formula, the approximate number of targets can be calculate
“Agent on Host” X“Associated Resources” = “Total Targets”
1 Agent X 5 Resources = 5 Targets
Note: Resources = Database, Listener, ASM, Host, Agent
1.1.1.2 Physical Hardware Requirements
Table 1: Physical Hardware Required
| Platform | Memory | CPU/Core | Local HDD |
| Oracle Management Server (OMS) | 8G | 2/4 | 500GB-1024GB |
| Oracle Management Repository (OMR) | 16G | 2/4 | 1024GB-2048GB |
1.1.1.3 Operating Systems
For Oracle Enterprise Manager 13c, the operating system will be Oracle Enterprise Linux 6.6 or later. RedHat Linux 6.6 or later can be used as well.
When installing the operating system, the following RPMs have to be included in the operating system:
1.1.1.4 Local File System allocation (OMS & OMR):
The operating system file system upon installation needs to be built is the structure as described in Table 2. This ensures that the components of OEM will have the needed space during installation and runtime.
Table 2: Filesystem Structure
| Filesystem | Size | Mount Location |
| /dev/mapper/lv_root | 100GB | / |
| tmpfs | 4GB | /dev/shm |
| /tmp | 10G | /tmp |
| /dev/sda1 | 500MB | /boot |
| /dev/mapper/lv_u01 | 500GB | /u01 |
| NFS Mount (shard between OMS nodes) | 500GB | /dbadeeds/swlib |
| NFS Mount (shard between OMS nodes) | 150GB | /dbadeeds/bip |
1.1.1.5 Network:
The network interface that is needed for OEM is a standard network interface. The protocol for communication will be TCP/IP with addresses on the same network and subnet as established within the network. If addressing cannot be on the same network and subnet, then routing will need to be established between subnets to ensure communication. All ports, for the short term, should be enabled and open for communication during implementation.
The ports that are required for Oracle Enterprise Managercan be found in Oracle documentation (Oracle Enterprise Manager Cloud Control Basic Install: Chapter 6). The below table also highlights the ports required.
Table 3: Ports Required for OEM
| Service | Port |
| Admin Server HTTP SSL | 7101-7200 |
| Enterprise Manager Upload HTTP Port | 4889 – 4898 |
| Enterprise Manager Upload HTTP SSL Port | 1159, 4899 – 4908 |
| Enterprise Manager Central Console HTTP Port | 7788 – 7798 |
| Enterprise Manager Central Consol HTTP SSL Port | 7799 – 7809 |
| Oracle Manager Agent Port | 3872, 1830 – 1849 |
| Node Manager HTTP SSL Port | 7401 – 7500 |
| Managed Server HTTP Port | 7201 – 7300 |
| Managed Server HTTPS Port | 7301 – 7400 |
1.1.1.6 Hosts Entries on OMS servers
The etc/hosts file on each of the OMS servers is as follows:
Copied all host entries in each OMR/OMS servers
1.1.1.7 SSH Configuration
To allow the Oracle user account access to servers that need to have agents installed, DBADEEDS needs to configure secure shell (SSH) equivalency between the OMS nodes (omsprod01 & omsprod02) and the target system. This is done by following these few steps that are listed below:
1.	Change directory to the Oracle user home
$ cd ~
2.	Create new directory if not already established
$ mkdir ~/.ssh
3.	Set permissions on ssh directory
$chmod 700 ~/.ssh
4.	Generate the rsa key needed
$ ssh-keygen –t rsa
5.	Copy the rsa key into an authorized key file
$ cat id_rsa.pub >>authorized_keys
6.	Move the authorized key file between desired servers
$ scp ./authorized_keys<userid>@<server_name>
7.	Repeat steps 1-6 on source/target server and move keys as needed.
Note: The authorized_keys file will contain all keys between servers; be careful to not overwrite the file.  Only append to the file.
Logical Architecture Components
The directories described here will be used when installing the Oracle binaries for various products in the environment.
Note: These directories may be amended by the client if they do not fit their organizational deployment structure.
| Default Values | |
| ORACLE_BASE | /u01/app/oracle |
| ORACLE_HOME | /u01/app/oracle/product/12.1.0.2/dbhome_1 |
| OMS_HOME | /u01/app/oracle/product/13.2.0.0/middleware |
| GC_INST_HOME | /u01/app/oracle/product/13.2.0.0/gc_inst |
| OMS_AGENT_HOME | /u01/app/oracle/product/13.2.0.0/em_agent |
| AGENT_HOME | /u01/app/oracle/product/13.2.0.0/em_agent/core/13.2.0.0.0 |
OMR & OMR Installation & Configuration Procedure
OMR Database
Create the Primary database on oemrdbdev01 server using Enterprise Manager Templates.
- Copy silent installation scripts
- Validate the ASM disks
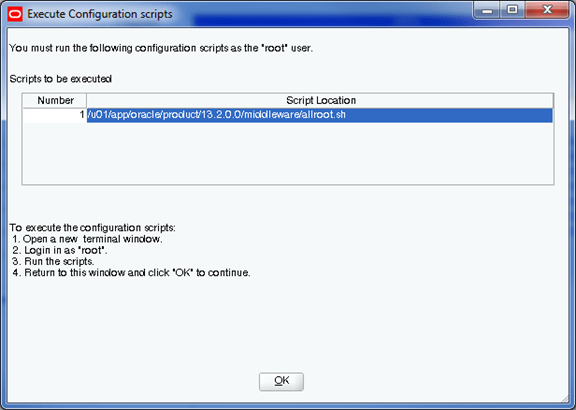
- Install GRID software using silent method.
- Configure the ASM disks using silent method.
- Install ORACLE DB software using silent Method,
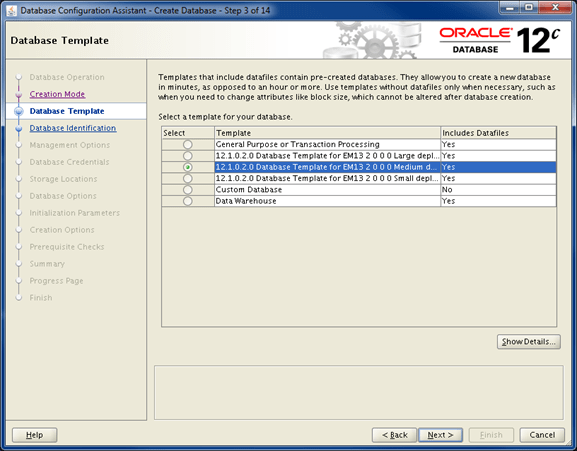
- Repository Database Creation Using Template
We are going to use the repository template to create the repository database. If you are creating the database manually, remember to check all the prerequisites here, some of which include the following.
• Database version 12.1.0.2 Enterprise Edition.
• The OPTIMIZER_ADAPTIVE_FEATURES initialization parameter should be set to FALSE.
• Character set AL32UTF8.
The template includes all the relevant database settings, but make sure the character set selected using the creation, as described below.
Unzip the repository template under the ORACLE_HOME.
Unzip the repository template under the ORACLE_HOME.
$ cd $ORACLE_HOME/assistants/dbca/templates
$ unzip /tmp/12.1.0.2.0_D*_T*for_EM13_2_0_0_0_Linux_x64.zip

Start the Database Configuration Assistant (DBCA) and create a new database using the template.$ dbca Select the “Create Database” option and click the “Next” button.

OMS Installation
- SSH connectivity among node1 & node2 completed
- Check the /etc/hosts entries
- Validate the shared locations /dbadeeds/swlib * /dbadeeds/bip entries in /etc/fstab
- Copying the Binaries from


Configure the Server Load Balancer (SLB)
As shown above, the install of the first OMS configures the system so that the Cloud Control users and agents connect directly to the OMS using its physical hostname. In a highly available Cloud Control configuration, multiple OMS servers are present and users and agent should connect to the OMSs via a load balancer which is able to direct traffic to available management services. SLB configuration should be done immediately after installing the first OMS.
OEM agents to connect to OEM will use a BigIP Service Load Balancer (SLB). The SLB will have two entries, one for Omaha primary OMS and one for the secondary OMS in the VMWare clusters. This will allow continuous connections to OEM in a disaster scenario. Information on configuring the BigIP Service Load Balancer can be found in the Oracle documentations in chapter 17.3.4.2:
Update OMS configuration
Update OMS configuration
After the SLB setup was completed we needed to resecure the OMS using the SLB hostname.
$OMS_HOME/bin/emctl secure oms -sysman_pwd ***** -reg_pwd **** -host oemdev.co.dbadeedssystems.com -secure_port 4903 -slb_port 4900 -slb_console_port 443 -slb_jvmd_http_port 7201 -slb_jvmd_https_port 7301 -console
./emctl secure oms -slb_bip_https_port 5443
Following this command the OMS was restarted.
“emctl status –details” output now shows that the OMS is configured against an SLB
623  cd $EM_AGENT_HOME/bin
624  ./emctl secure agent -emdWalletSrcUrl https://oem.co.dbadeedssystems.com:4900/em
625  ./emctl upload agent
626  ./emctl status agent
627  cd $OMS_HOME/bin
628  ./emctl status oms -details
629  ./emctlsecdiagopenurl -url https://oem.co.dbadeedssystems.com:4900/empbs/upload
The above output shows that the Console and Upload URLs now reference the SLB rather than the physical host of the OMS. Although the SLB has been configured , the agent that was previously deployed on the OMS is still uploading to the physical hostname of the first OMS server. This can be seen from the output of an “emctl status agent” command:


SLB Details
Load Balancer Configured Yes
Load Balancer Configured Console URL https://oemdev.SLB.com:443
Load Balancer Configured Upload URL https://oemdev.SLB.com:4900
1.1.1.1 Adding another Oracle Management Service
This section will focus on how to add another Oracle Management Service (OMS) to the existing Oracle Enterprise Manager 13c infrastructure. This approach is one of the ways which this process can be done.
Note: At the time of writing, the mount point for Business Intelligence Publisher (BIP) was not established. Shared BIP resources will need to be configured after mount point is available.
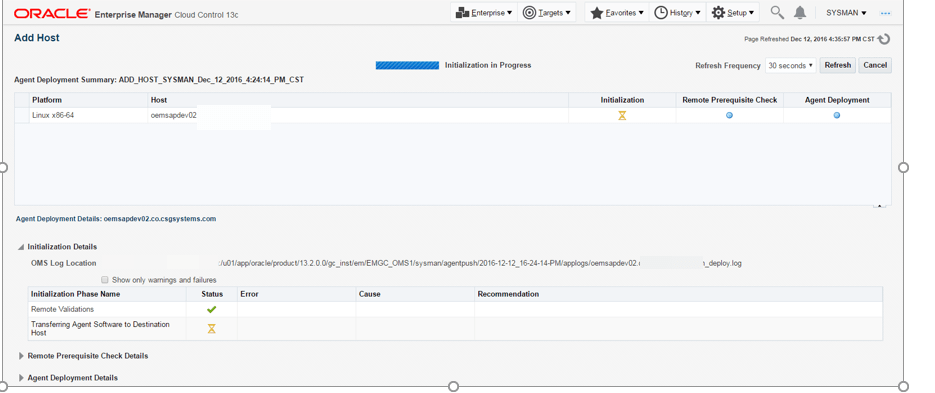
Before you can provision another OMS, the server that will be used as an OMS server needs to have an EM Agent installed on it. Steps for installing an EM Agent can be found in Section 6 and Section 7 of this document. Additonally, the software library has to be configured in the Oracle Management Service.
1.1.1.1.1 Install agent on second OMS server
Go to Setup | Add Target |Add Targets Manually and use the guided workflow for Add Host Targets to complete the installation of the Enterprise Manager agent.

Provision “Add Management Service”
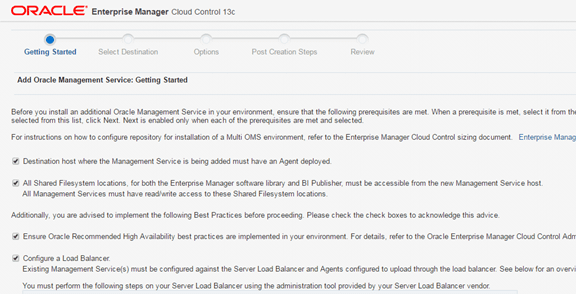
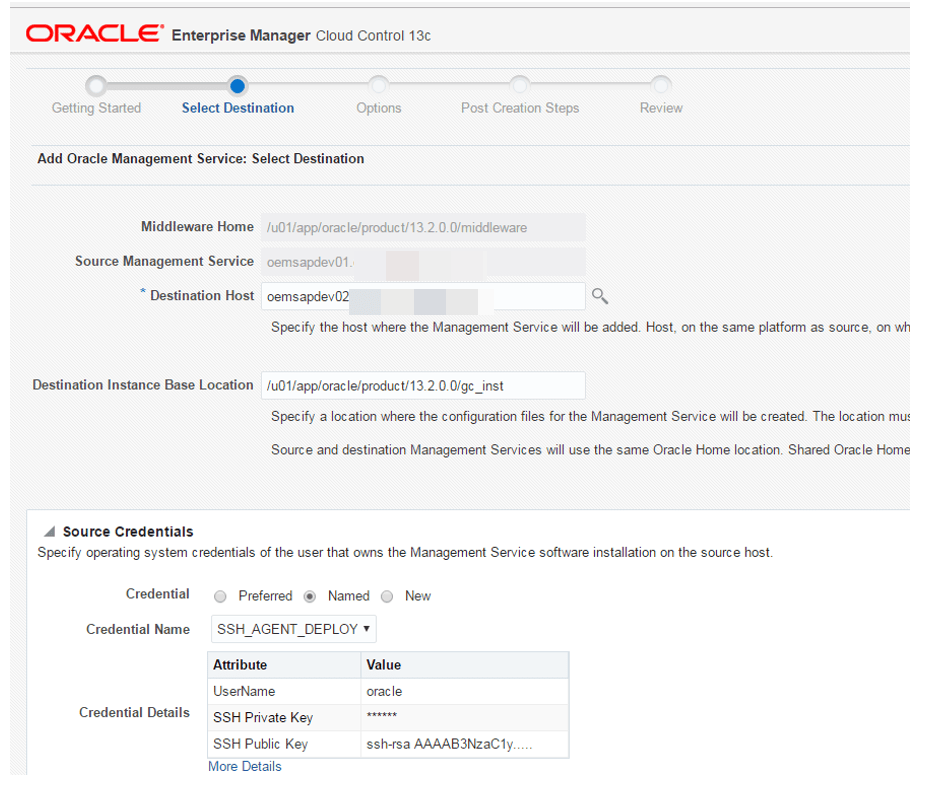
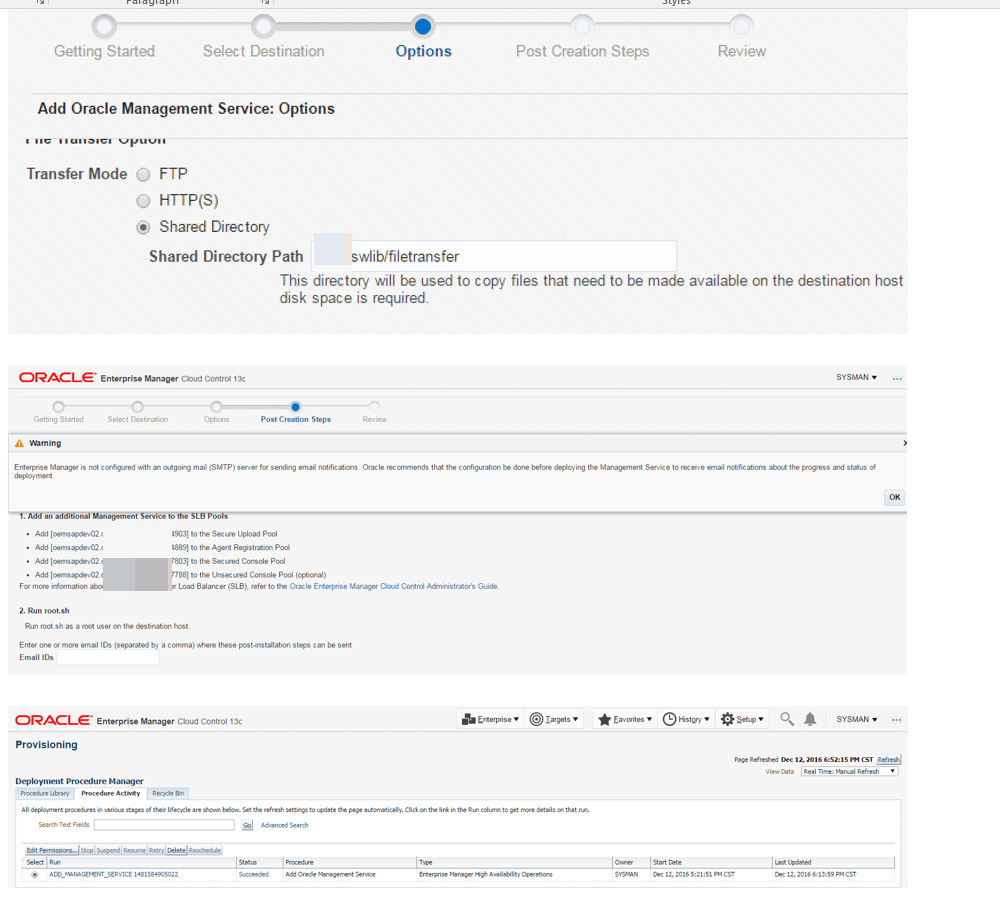
The “Add Management Service” Deployment Procedure is provide out of the box. It runs a series of pre-requisite checks on the target Management Service host and performs a clone of the primary Management Service to add a second OMS. Prior to running the Deployment Procedure, we ensured we were running the latest version of the Deployment Procedure by going to Self-Update and checking the Provisioning Bundle Updates (Setup | Extensibility | Self Update). This showed that there were no pending updates to apply and we were therefore running the latest version of the Deployment Procedure.
In order to provision another OMS server, you will need to follow these steps.
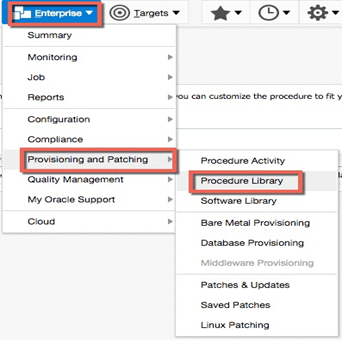
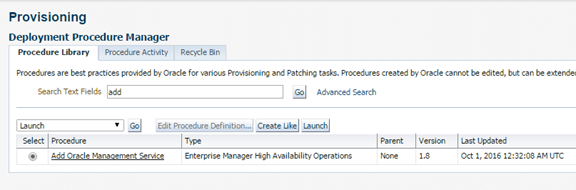
- Access the Procedure Library (Enterprise -> Provisioning and Patching -> Procedure Library
- After ensuring that the latest version is being used, the Deployment Procedure can be accessed by navigating to Enterprise | Provisioning and Patching | Procedure Library and selecting the Add Management Service Deployment Procedure
Configure Standby Database
Adding a Standby Database ensures that the repository database is protected from complete failure. Standby Databases provide a copy of the data in a separate environment, which can be activate in the event of a primary failure.
Install agents on Standby nodes
Before the standby database can be configure, the standby database servers must be added to the cloud control environment. This was done using the agent deployment wizard as seen in previous steps Goto Setup | Add Target | Add Host Targets and use the guided workflow for Add Host Targets to complete the installation of the Cloud Control agent.
1.1.1.1 Backing up OEM components
1.1.1.1.1 Backup Location:
The Oracle Management Repository (OMR) will be backed-up daily using Oracle Recovery Manager (RMAN).
OMS Binaries Backup:
At the disaster recovery site, once identified, the OMS binaries will be kept in sync between the active VMWare Clusters and OMS servers by using SunGuard storage replication. This will ensure that the OMS servers on both the active and passive nodes are in-sync and can be used in the event of hardware failure.
OMS Configuration Backup:
Oracle Enterprise Manager 12c is generally a stateless environment, but can change when targets are modified or other changes are made. A snapshot of the OMS configuration will be taken by using an emctlcommand. This command only needs to be run anytime the OMS environment changes or on-demand. OEM is configured to run this job once a week, every Friday, to backup the OMS configurations. This job name is: OMS_CONFIG_BACKUP_JOB.
The emctlexportconfig oms command will produce an XML file that will have all the static information for the OMS. This file will be created in the /mnt/exp/OMS directory.
OMS_HOME/bin/emctlexportconfig oms –sysman_pwd “<pwd>” –dir /mnt/exp/OMS

Leave a comment